Tutorial on streaming video
In this tutorial we are going to learn how to use the Blue Seal Video Controller to catch a live video stream from an arbitrary computer running gstreamer or from the Raspberry Pi with the camera module via Wi-Fi network.

Installing the Gstreamer
In order to stream a live video from a PC to an Android device equipped with the Blue Seal Controller, we need to install the Gstreamer on the PC first. You can learn more about the gstreamer on its WIKI-page.
There are two releases of the Gstreamer- Gstreamer 0.10
- older but less computationally demanding
- codecs support provided by open source FFmpeg audio and video processing tool
- Gstreamer 1.0
- new and supported version but more computationally demanding
- codecs support provided by open source Libav audio and video processing tool
Installing Gstreamer on Ubuntu
Both releases of the Gstreamer are present in the standard installation of Ubuntu. Nevertheless, we can install the version 0.10 and the important packages if needed with following commands:
sudo apt-get install gstreamer0.10-tools gnome-media
sudo apt-get update
sudo apt-get install gstreamer1.0*
Installing Gstreamer on Windows or Mac OS X
Installing the Gstreamer on Windows/Mac OS X is a little more manual than for the Linux. You can get the proper installer for the version of your operational system on the official homepage. However, only the version gstreamer-1.0 is available.
There are always two installers: normal and tools for developing. We want to install the normal one (without the world devel in the file's name). The latter provides only some additional tools and not the gstreamer itself.
You can run the gstreamer in Windows directly from the Command line, but you have to be in the same folder as the file gst-launch-1.0 (for typical installation C:\gstreamer\1.0\x86\bin\).
Testing the Gstreamer on PC
The gstreamer operates in terms of pipelines. You can learn more about the concept of pipelines in this official tutorial. Every pipeline consists of two basic elements: source and sink. Both these elements possess pads which can be connected together. Between these two elements further elements can be inserted. The other elements can do various tasks as encoding, decoding or filtering the data comming from the source before the date is flushed into the sink.
We can test whether the Gstremaer is working properly on your PC by creating a test pipeline. Just type the following command in Terminal
If everything run correctly, a window shoving a test image warping in time should have opened on our PC's screen. zou can exchange gst-launch-0.10 for gst-launch-1.0 to use the newer version.
Now, we know that the Gstreamer works properly. We can even play a little bit with the program and open some audio file from PC's hard disk drive with command
- filesrc location= is the path to the audio file called music.ogg
- vorbisdec is the decoder needed
- alsasink is the output of the pipeline
Testing the live video stream on a single PC
Now, when the gstreamer works, we can even test it further by streaming the video from the PC and catching it and showing it directly on the same PC in a second Terminal (or second Command line in case of Windows).
We will use TCP/IP protocol to stream the video since we are on a Wi-Fi network and the delay or the transition speed will not be a trouble.
There will be always two applications running. One will be server and the second will be client. The server will obtain the video either from a file or from a camera and create a TCP/IP server. The second application, a client, will connect to the server, catch the data and display them.
The server can be started by typing
The client can be started by typing
- host is the IP address of the PC being the server
- port is the port used for the streaming
- leave out the linux command sudo for usage on Windows/OS X
- or replance gst-launch-1.0 with gst-launch-0.10 fo the older version o the Gstreamer
The two commands are no magic. With the first command, we create a server which takes the test video source and encodes it using codec H264. The element rtph264pay payload-encodes the H264 video into RTP packets and the last element creates the server waiting for a client to send him the packets.
The client connects to the server and obtains the RTP packets which has to be extracted into H264 video. The video is then decoded and send to the video sink.
Voilà! We have just created test live video stream! The next step is to learn how to stream the live video from a PC into the Blue Seal Video Controller.
Note on UDP streaming
The Gstreamer also offers possibility to stream the video over UPD protocol. The pipelines do not differ much. The main difference is hiden in the parameter host which now points to the IP address of the client receiving the video stream.
Start the UDP server withStart the UDP client with
- host is the IP address of the PC running the client
- port is the port used for the streaming
- leave out the linux command sudo for usage on Windows/OS X
- or replance gst-launch-1.0 with gst-launch-0.10 fo the older version o the Gstreamer
Note on the difference between TCP and UDP
Both protocols have different application. Whereas the TCP protocol ensures that the data are transferred and received by the client, the UDP server just sends the data without carrying about the client. Pro and contra of these two protocols can be found on the internet.
A more interesting thing is the workload of the PC running the TCP or UDP server while streaming to several clients. The overview hoe to use Raspberry Pi with camera and gstreamer to stream the live video and the workload of the processor wit respect to the number of connected clients can be found here.
Streaming the video from PC to the BS Video Controller

We have learnt how to install and use the Gstreamer on a single PC so far. Now it is the right moment to learn how to stream a live video from a PC into an Android device running the Blue Seal Controller.
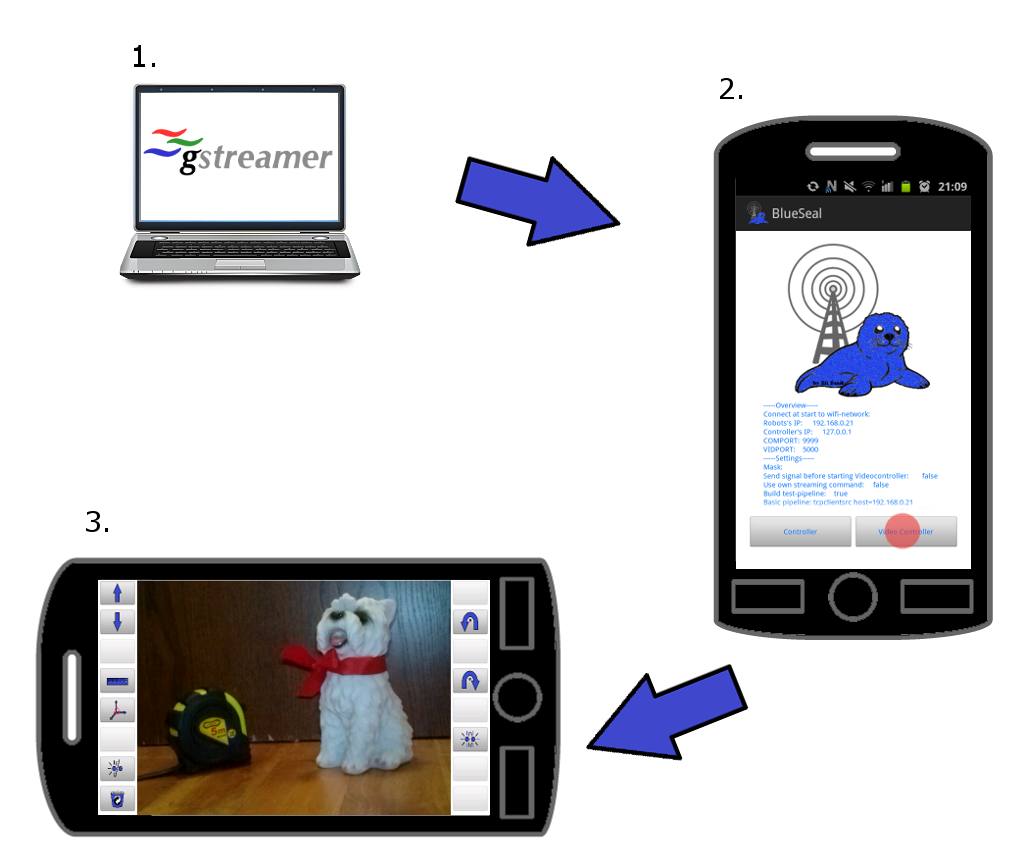
On the picture to the right, we have the schematic how to set up the stream . We are going to describe it in greater details in a moment.
At this place, we have to make some remarks on the delay of the stream. Naturally, we desire the smallest delay in the video stream as possible. The Blue Seal Controller does not use any buffer so the received data are displayed as soon enough parts are received. We cannot change this.
The delay may be influenced by several factors as- resolution and the frame rate of the streamed video
- throughput of the network
- speed of the Android phone
There are two parameters in the Blue Seal Controller: $(VID_W) and $(VID_H) which can be set in Settings/Video Controller/. These parameters determine the resolution of the object displaying the video in the BS Video Controller. If the resolution is set to be too high, the mobile device may have troubles to handle the application BS Video Controller computationally. This can result in an interrupted video stream.
Let us now describe how to stream the video step by step.
The steps are
- Setting-up the server on a PC
We use the Gstreamer on a PC to create the TCP server streaming the video to the client once the clients connects to the server. The following command creates a pipeline starting with test video of snow pattern which is encoded with codec H264 and then translatet into RTP packets. The packets are send by the TCP server to the client once it connects.sudo gst-launch-1.0 -v videotestsrc pattern=snow ! x264enc ! rtph264pay ! tcpserversink host=192.168.0.21 port=5000- port denotes the value of the part used by the TCP server
- host specifies the IP address of the TCP server
- Setting-up the Blue Seal Controller
Before we can catch the test video stream on an Android device, we need to take care of few things first. The Android device has to be connected to the same network as the streaming PC as we explained here. We need to be sure that the values $(IP_R) and $(VIDPORT) are set to the proper values matching the IP address of the PC running the server and the video port from previous step, respectively.
We also need to go to the settings of the Blue Seal Controller and be sure that the following values are set to- Settings/BS Video Controller/BS Video Controller/Build test pipeline -> false
- Settings/BS Video Controller/BS Video Controller/Build own pipeline -> false
Now, we can start the BS Video Controller by pressing the button on the right of the starting screen as demonstrated on the picture by a red dot. - Displaying the live video stream
If everything worked correctly, we will be welcomed by a small pop-up window informing us about the pipeline which has been build. And after closing this window, we can see the live video stream broadcasting directly from your PC to your phone in real time!
We can even combine this tutorial with the previous one and use the buttons in the BS Video Controller to command the computer while watching the live video stream or obtain and then write out data from the computer.
If there occurs any error, we will be informed by an alert window with detailed informations.
Streaming live video from Raspberry Pi into the BS Video Controller

Now, when we have learnt how to stream a video from a PC into an Android device with the BS Video Controller (with possibility of having a simultaneous control the PC), we can substitute the PC with any device, which can stream a video over TCP/IP protocol as the Raspberry Pi computer.
The only thing needed is to have a Raspberry Pi computer with the Camera module connected to the same network as the BS Controller. We also need some basic programs to be installed on the Rasperry Pi computer (We learn about the basic and useful programs and how to install them with a single script in this section). We can start video stream on the Raspberry Pi with the following code
The first part of the command tells the raspberry Pi to start taking video which is flushed into the Gstreamer (see this official RaspiCam Documentation for more details about the command raspivid).
Then, the Gstreamer creates a TCP/IP server and wait for clients. When a client connects, the video is send over network to the client. For example, an Android device with the Blue Seal Controller can be such a client and can receive and display this video.
In order to receive and display the video in the Blue Seal Video Controller, we can follow the steps 2. and 3. of the previous part.
Remarks
We have seen some basic examples how to stream video from a PC or Raspberry Pi over network into an Android device with the Blue Seal Controller.
The magic of the Blue Seal Controller is that it incorporates the full Gstreamer-0.1 with all plug-ins allowing us to play a lot with the video stream and its displaying. We can just build our own pipeline by going to settings and changing keys
- Settings/Video Controller/Video Controller/Build own pipeline -> true
- Settings/Video Controller/Video Controller/Define own pipeline -> define_own_pipeline
Where the value define_own_pipeline represents your own pipeline. This offers a lot of possibilities for people skilled in Gstreamer and also freedom to use the Blue Seal Controller for more purposes than originally planed.
Since the Video Controller has no buffer integrated, the received video data are immediately displayed. Nevertheless, the video stream can be significantly delayed due to the nature of the ITC/IP protocol if the quality of the video(i.e., resolution or frame rate) is too high. In order to decrease the delay, we can try to lower the video quality. Other approach would be to use the UDP protocol for video streaming(as shown in the note at the beginning of this page).
Unfortunately, the UDP protocol affects the quality of the video in the negative sense. This means that one cannot achieve a video stream of very high quality and low latency simultaneously and a compromise has to be found.
Conclusion
In this tutorial we have learnt how to stream a test live video over a network from one PC to an another using Gstreamer. Further, we have seen how to use the Blue Seal Video Controller to catch and display the life video stream on your Android device in the Blue Seal Controller with near-zero delay. In the end we presented a way how to substitute the streaming computer with the Raspberry Pi computer with the Camera module. The Blue Seal Video Controller can catch and display the streamed video and also simultaneously send commands to a script operating on the Raspberry Pi on a different port.


Share this page with friends via