Creating the shutdown button

In this article we are going to learn how to construct a simple hardware button, how to connect it to the Raspberry Pi and how to handle a press of the button with a simple Python script running as a Daemon process in the background.
Since the Blue Seal Robot should one day act on its own with an artificial intelligence, it is important to have a proper way how to manually shutdown the Raspberry Pi without risking any damage to the system installed on the SD-card.

Therefore we will construct a simple hardware button which we connect to the GPIOs on the Raspberry Pi and create a process waiting in background for a pressing of the button. Once the button is pressed, the script will notice this and start a shell command which will call for the full system stop in our case(but there are no limits for the reader's fantasy).
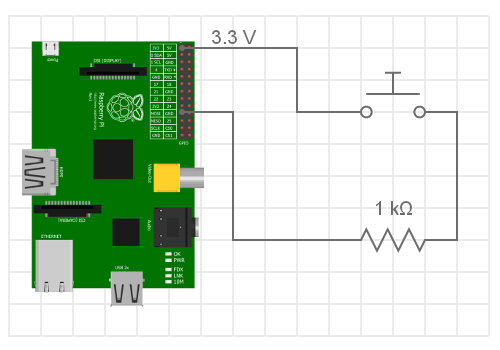
The button is shown on the right and consists of two main parts:
- push-button switch,
- 1kΩ resistor.
The resistor is important to ensure that we will not burn the Raspberry Pi if we make a mistake.
There are many good tutorials on the internet on how to make a button and use it with the Raspberry Pi. I would recommend this one, to learn more details about various ways how to connect and use a button with the RPi.
The schematics of the button and its wiring is shown on the following picture:

Once the button is connected to the RPi as shown on the upper circuit, we can write a simple program in Python to detect the pressing of the button and send the shutdown signal to the core. This can be managed by a simple script as this one:
#!/usr/bin/python
    ###------------------------------------------------------------------
    ###    This code is a part of a tutorial for the Blue Seal Project
    ###     created by Jiří Daněk (www.bluesealproject.com).
    ###    Please, do not remove this remark from the code.
    ###------------------------------------------------------------------

import RPi.GPIO as GPIO
import time
import os

GPIO.setmode(GPIO.BOARD)
port = 26            # the GPIO port used for pull-down detection
GPIO.setup(port, GPIO.IN, pull_up_down=GPIO.PUD_DOWN)
                     # set the port to use the internal pull-down of the RPi

try:
   while True:                               # neverending loop
      if (GPIO.input(port) == 1):            # if pull-down action detected
         os.system("sudo shutdown now -h")   # execute the full stop of the system


except KeyboardInterrupt:
	GPIO.cleanup()     # in case of keyboard interruption release ports
The code can be dowloaded here.
Where we used the 26-th GPIO port for the pull-down and connected the resistor to it. The button is connected to the GPIO pin with the lower voltage of 3.3V. You should always check the layout of your Raspberry Pi which differs from version to version in order to avoid using GPIO ports which are specified for the I2C.
Run the button script as daemon
On the previous lines we have learned how to connect and operate the button with a simple script. Now we just need to tell the RPi to run this script at the start of the system. This can be done by the daemon tool. Daemon is a part of the system and we do not need to take care of this.
Nevertheless, we need to tell the system to run the Python script as daemon at the start of the system. This can be easily done by the following shell script:
#!/bin/sh
#/etc/init.d/runBUTTON

    ###------------------------------------------------------------------
    ###    This code is a part of a tutorial for the Blue Seal Project
    ###     created by Jiří Daněk (www.bluesealproject.com).
    ###    Please, do not remove this remark from the code.
    ###------------------------------------------------------------------

### BEGIN INIT INFO
# Provides: 		runBUTTON
# Required-Start:	$remote_fs $syslog
# Required-Stop:	$remote_fs $syslog
# Default-Start:	2 3 4 5
# Default-Stop:		0 1 6
# Short-Decription:	Starts set of PYTHON scripts as daemon in background.
### END INIT INFO

#-------------Variables-------------------
DIR=/home/pi/Code/BS			#Directory of the switch_of_button script
DAEMON=$DIR/button.py			#script's name
DAEMON_NAME=SWITCH_OFF_BUTTON           #identification


# Which user runs the button script
DAEMON_USER=root

#The process ID of the script when it runs is stored here
PIDFILE=/var/run/$DAEMON_NAME.pid


. /lib/lsb/init-functions

#Carry out specific functions when asked to by the system
case "$1" in
  start)
    echo "Starting switch off button-script on one GPIO port"

    #START SWITCH-OFF BUTTON SCRIPT
    start-stop-daemon --start --background --pidfile $PIDFILE --make-pidfile --user $DAEMON_USER --chuid $DAEMON_USER --startas $DAEMON

    ;;
  stop)
    echo "Stopping button-script on port GPIO 26"

    #STOP SWITCH-OFF BUTTON script
    start-stop-daemon --stop --pidfile $PIDFILE --retry 10

    ;;
  status)
    status_of_proc "$DAEMON_NAME" "$DAEMON" && exit 0 || exit $?
    ;;
  *)
    echo "Usage: /etc/init.d/runBUTTON {start|stop|status}"
    exit 1
    ;;
esac

exit 0
The code can be dowloaded here.
This script must be save in folder /etc/init.d/ under the name runBUTTON.sh. The Python script for the button must be called button.py and be saved in the library /home/pi/Code/BS/ since these values are defined in the upper script as variables DIR and DAEMON, respectively.
After we have named and copied all files into the right folders, we need to make the script runBUTTON.sh executable by providing it the proper rights by executing command
Now, we should be able to start our Python script as daemon in the background using command
There is one last step required: we need to run the command
This command adds in symbolic links to the /etc/rc.x directories so that the init script is run at the default times(we can see these links if we execute command ls -l /etc/rc?.d/*runBUTTON.sh).
Now the button is ready to be pressed after every start of the RPi and to send the system back to sleep. A nice tutorial explaining the last steps in greater details can be found here.
In this article we learned many new things. We demonstrated how to construct a button and connect it to the Raspberry Pi and detect its pressing with a simple Python script. Moreover, we have show how to manage the script to start as daemon at the start of the system and run as a background process.


Share this page with friends via